Run your ECS cluster with service discovery and HAProxy for $8 a month
Keeping things simple
When working on side projects I always try to keep things simple and focus on the important things at the beginning as delivering values is key. I don’t want to deal with clusters, HA, pipelines etc. because it’s more than alright to deploy to production from your laptop in the early days. In this particular example, the infrastructure is basically an RDS instance (no multi AZ at this point) and an EC2 box with Ubuntu and docker installed on it manually. The deploy process is a simple shell script on my laptop that builds the container, uploads it to the registry, dials in to the remote box via SSH and does a docker pull. Super simple. However as time passes and the project gets traction, it’s getting more and more pressing to come up with at least a semi-scalable solution which is what this post is about.
I recently got to a point where I wanted to introduce multiple containers (Django web server, celery worker, celery beat). Sure, I could just add another build and pull command to my existing script, but I figured maybe there’s a simple way to do this in a more proper fashion without blowing the budget. ECS seemed like a good choice (EC2 based on Fargate seems to be more expensive at this small scale) because it deals with deployment, container scheduling, logging, monitoring, etc. My only worry was that putting a load balancer in front of the services would increase the monthly budget by 50% (again, we’re talking very small scale), therefore I started looking for alternate solutions. And that’s when I found a solution provided by ECS itself.
Service discovery à la ECS
As it turns out, ECS supports service discovery out of the box, which is great as it solves half of my problem. If service discovery is enabled, a private Route53 zone is created (and managed by the service discovery service) and whenever a new container is scheduled, a new SRV and A record will be created automagically. I didn’t know this before, but using an SRV DNS record, you can define not just the target location, but also the target port. This solution works beautifully with dynamic port allocation which allows running multiple instances of the same service on a single physical box. The other huge benefit of this implementation is that there’s no Elastic Load Balancer involved, it all relies on DNS records and them being up to date. Think of it as a client side load balancing. And this is where I need a solution for the other half of the problem. I will need a reverse proxy in front of the services in order to resolve the DNS entries and to provide a single port exposed to the outside world. And this is where HAProxy comes to play.
I’ll be honest here, I don’t have any prior experience with HAProxy so please don’t take any of the remaining post as a guide or as a best practice. The goal here is to explore possibilities that can save you a couple of bucks (literally a couple) at the early phase of your project. My first choice was Nginx as I have some experience with it. Unfortunately it does not support this use case only in their Nginx Plus offering, therefore HAProxy it is.
As you’ll see later it’s fairly straight forward to set it up and configure, also it’s still just a proxy server at the end of the day with load balancing, so if you’re familiar with the concept, there’s nothing new here really.
One more important thing is that if you get to a point where you need a more reliable solution, it’s very easy to just reconfigure the ECS service to use and actual load balancer.
Scope of this post
In this post I’d like to walk you through a simple concept, which I’m sure is not perfect, so please do let me know if I missed something!
The goal will be to:
- Create an EC2 spot instance based ECS cluster
- Create a simple http hello-world ECS service with service discovery enabled
- Create an EC2 box that’ll host HAProxy
- Configure HAProxy and set up SSL termination using Let’s Encrypt’s certbot
Setting up ECS
1. Without going into too much detail on how to use ECS, let’s create a new ECS cluster, select EC2 Linux + Networking and use the following configuration:
- Provisioning model: Spot
- Allocation strategy: Lowest price
- EC2 instance types: t2.micro, t2.small, t3.micro, t3.small
- Number of instances should just be 1 at this point
- Create a new VPC
- Either select an existing or create new container instance and spot fleet IAM roles
- No need to enable Container Insights
2. Once the cluster is ready, create a task definition for our hello-world service. Again, without going into too much detail, these are the key configuration points:
- Name: hello-world
- Compatibilities / Requires compatibilities: EC2
- Container definitions:
- image: strm/helloworld-http
- port mappings:
- containerPort: 80
- hostPort: 0 <= This will specify dynamic port allocation on the host
3. With a cluster and a task definition we can now create the service:
- Launch type: EC2
- Task definition / revision: hello-world (latest)
- Cluster: select your cluster created in step 1
- Service name: hello-world-service
- Service type: Replica
- Number of tasks: 3 <= In order to test load balancing
- Deployment type: Rolling update
- Load balancer type: None <= Whole point of this post
- Enable service discovery integration: checked
- Namespace: create new private namespace
- Namespace name: internal
- Cluster VPC: select the VPC that belongs to the cluster created in step 1
- Configure service discovery service: Create new service discovery service
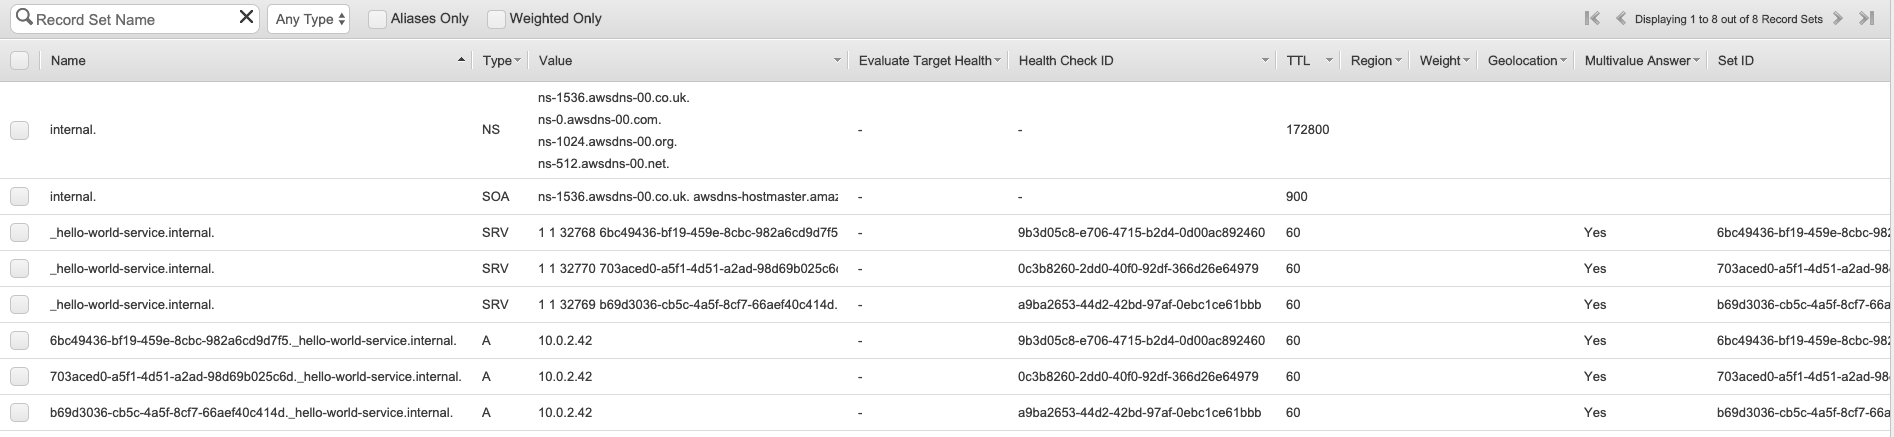
- Service discovery name: _hello-world-service <= Very important: HAProxy will only resolve the SRV DNS correctly if it starts with an underscore
- Enable ECS task health propagation: checked
- Service Auto Scaling: Don not adjust the service’s desired count
Setting up HAProxy
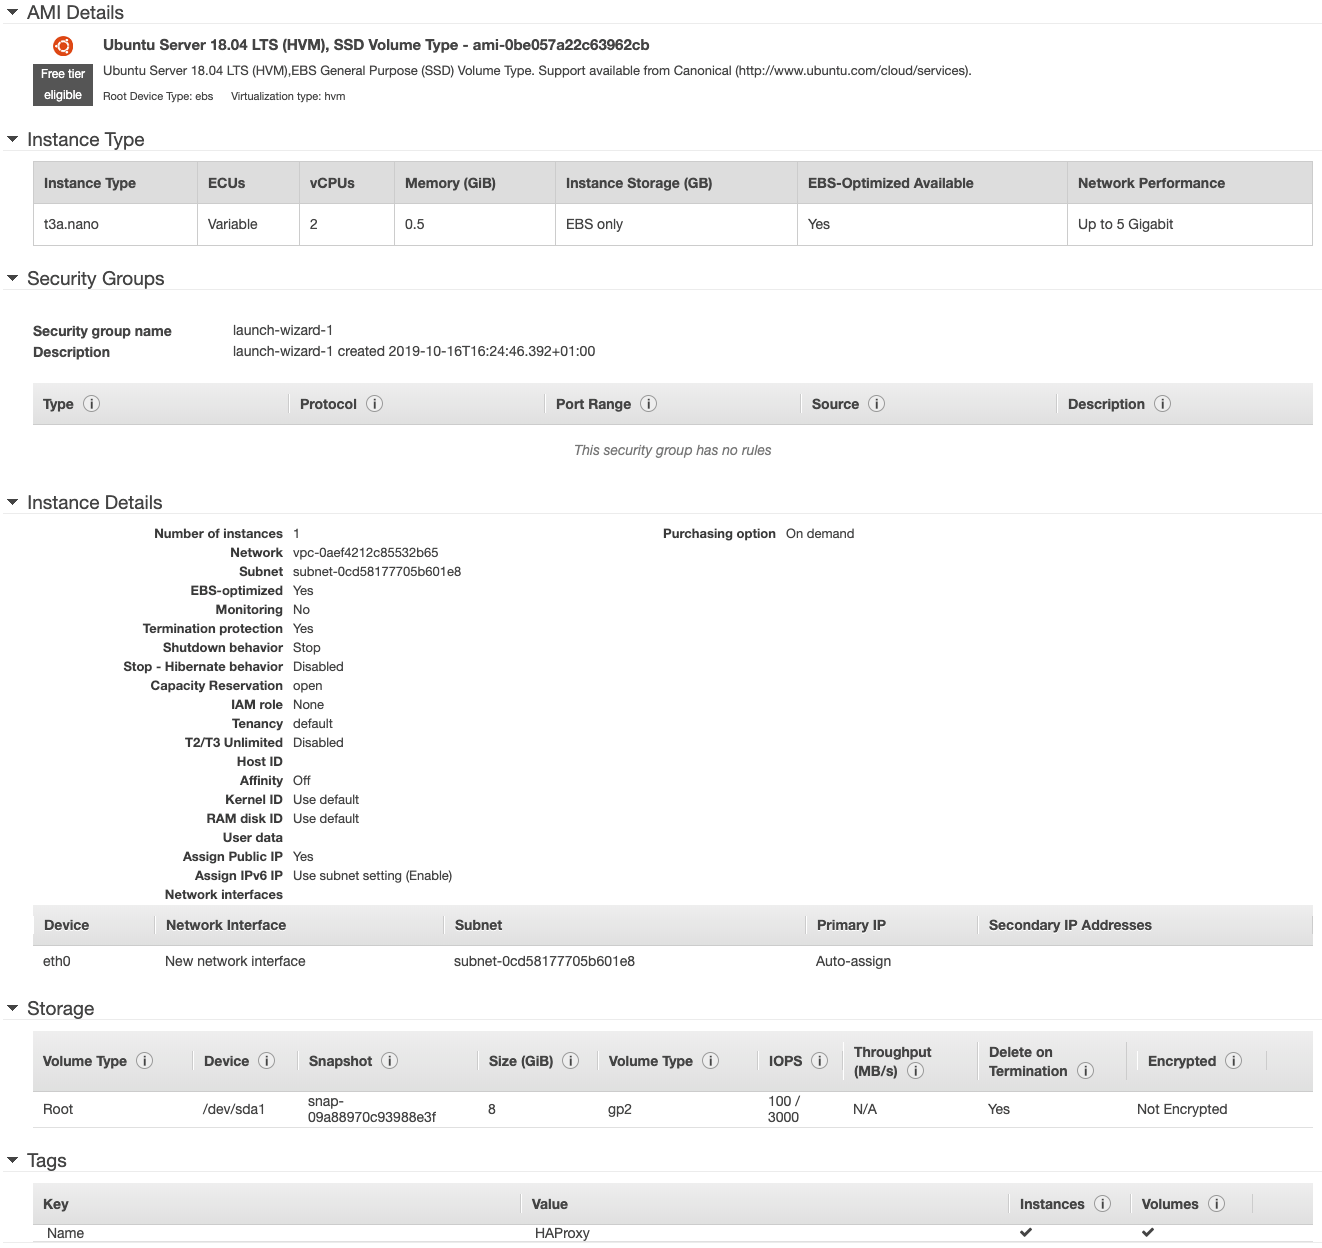
1. Create an EC2 box. Here I just simply created a t3a.nano EC2 instance with Ubuntu 18.04 LTS. The important bit here is to make sure to place the instance in the same VPC as the ECS instances.
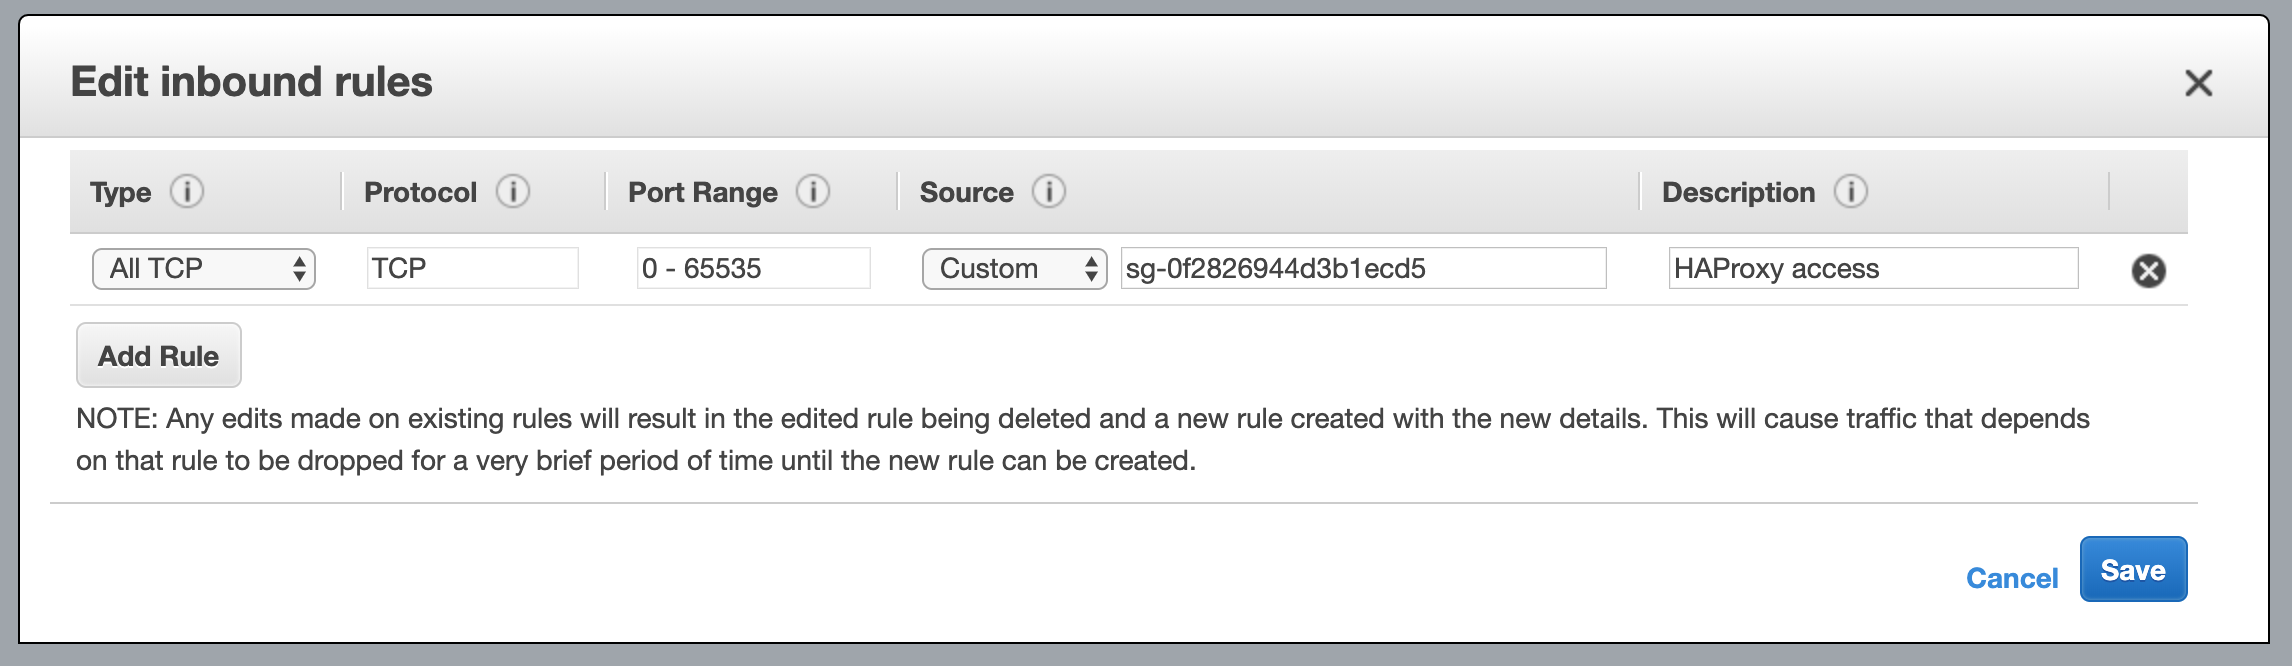
2. Configure security groups. In order to be able to access all ports on the instances, you’ll need to add an Inbound rule to the security group used by the ECS instances. The rule should allow All TCP traffic coming from the security group created for the HAProxy instance.
3. At this point we can test if we have access to the services and if the DNS resolution is working correctly:
- SSH into the EC2 box we’ve just created
- Test if
dig srv _hello-world-service.internalreturns the 3 SRV records we expect - Test if the record is accesible on the specified port, ie.:
curl 703a...c6d._hello-world-service.internal:32770
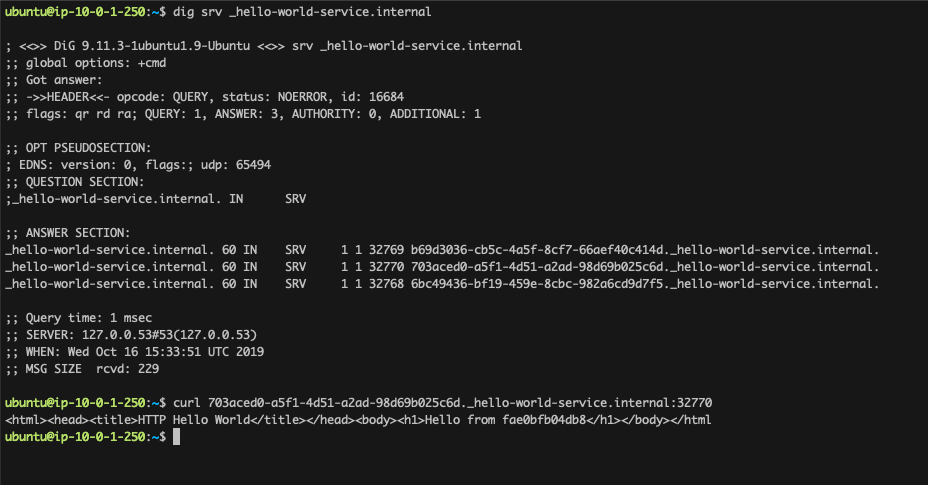
If you get a HTML response with Hello World, all is good so far.
4. Time do set up Let’s Encrypt. My preferred way of doing that on AWS is via DNS so there’s no need to shut down the proxy server, or to have certbot specific route configurations. Basically certbot will use the machined IAM role to write some entries into the domain’s Hosted Zone in Route 53. The IAM role that you need to create and attach to the EC2 box is the following:
{
    "Version": "2012-10-17",
    "Id": "certbot-dns-route53 policy",
    "Statement": [
        {
            "Effect": "Allow",
            "Action": [
                "route53:ListHostedZones",
                "route53:GetChange"
            ],
            "Resource": [
                "*"
            ]
        },
        {
            "Effect" : "Allow",
            "Action" : [
                "route53:ChangeResourceRecordSets"
            ],
            "Resource" : [
                "arn:aws:route53:::hostedzone/YOURHOSTEDZONEID"
            ]
        }
    ]
}
Don’t forget to add your Route53 Hosted Zone ID to the resources section.
5. Time to install HAProxy and certbot:
sudo add-apt-repository -y ppa:vbernat/haproxy-2.0
sudo add-apt-repository -y ppa:certbot/certbot
sudo apt-get update
sudo apt-get install -y software-properties-common certbot python3-certbot-dns-route53 haproxy=2.0.\*
6. Let’s run certbot and prepare certificates for HAProxy:
certbot certonly -d *.yourdomain.com -d yourdomain.com \
    --dns-route53 \
    -m your.email@email.com \
    --agree-tos \
    --non-interactive \
    --server https://acme-v02.api.letsencrypt.org/directory \
    --logs-dir ~/letsencrypt/log/ \
    --config-dir ~/letsencrypt/config/ \
    --work-dir ~/letsencrypt/work/
Once the certificates are generated, you need to concatenate them for HAProxy:
sudo mkdir -p /etc/haproxy/certs/
DOMAIN='yourdomain.com' sudo -E bash -c 'cat ./letsencrypt/config/live/$DOMAIN/fullchain.pem ./letsencrypt/config/live/$DOMAIN/privkey.pem > /etc/haproxy/certs/$DOMAIN.pem'
7. Configure HAProxy: Open HAProxy configuration with your favourite editor (sudo nano /etc/haproxy/haproxy.cfg) and append the following at the end of the file:
# In case it's a simple http call, we redirect to the basic backend server
# which in turn, if it isn't an SSL call, will redirect to HTTPS that is
# handled by the frontend setting called 'www-https'.
frontend www-http
    # Redirect HTTP to HTTPS
    bind *:80
    # Adds http header to end of end of the HTTP request
    http-request add-header X-Forwarded-Proto http
    # Sets the default backend to use which is defined below with name 'www-backend'
    default_backend www-backend

# If the call is HTTPS we set the certificate and direct traffic to the
# backend server.
frontend www-https
    # Bind 443 with the generated letsencrypt cert.
    bind *:443 ssl crt /etc/haproxy/certs/yourdomain.com.pem
    # set x-forward to https
    http-request add-header X-Forwarded-Proto https
    # set X-SSL in case of ssl_fc <- explained below
    http-request set-header X-SSL %[ssl_fc]
    default_backend www-backend

resolvers awsvpc
  # Your nameserver address should always be your VPC CIDR block +2
  # (in this case 10.0.0.0 + 2 = 10.0.0.2) and port 53
  nameserver dns1 10.0.0.2:53
  resolve_retries 3
  timeout retry 1s
  # allow larger DNS payloads due to multiple entries
  accepted_payload_size 8192

backend www-backend
   # Redirect with code 301 so the browser understands it is a redirect. If it's not SSL_FC.
   # ssl_fc: Returns true when the front connection was made via an SSL/TLS transport
   # layer and is locally deciphered. This means it has matched a socket declared
   # with a "bind" line having the "ssl" option.
   redirect scheme https code 301 if !{ ssl_fc }
   # Servers for the running ECS service:
   server-template srv 3 _hello-world-service.internal check resolvers awsvpc resolve-opts allow-dup-ip init-addr last,libc,none
A little explanation here: The key configuration bit for this use case is HAProxy’s server-template directive that adds the backend servers dynamically, base on the response coming from the DNS server.
Once done, just restart HAProxy sudo service haproxy restart and everything should be good to go!
Like magic, but better!
Once the server has been restarted, you can open your browser and visit your domain. You should see a Hello from XYZ message where XYZ is a hash of the server’s container. Since the load is spread across multiple instances, every time you refresh the page, the target container can be a different one from the previous page load. I really hope you’ve found this post useful and if you’d like to do any further research, please see the resources I used below. Also, just to get a sense of scale and pricing, find below the current, the updated and the ELB based monthly charges.
Monthly charges
Current monthly charges:
1x t2.micro on demand:
$0.0132USD * 24 hours * 30 days = $9.5 per month
Total: $9.504 per month
Updated monthly charges:
1x t3a.nano on demand (proxy server):
$0.0053 * 24 * 30 = $3.816 per month

1x t3a.micro spot (ECS instance):
~$0.0031 * 24 * 30 = $2.232 per month

Route53 and Cloud Map charges:
~$1.5 per month
Total: $7.548 per month (yes, it means paying less for a more managed, more scalable solution)
Monthly charges using an ELB:
1x t3a.micro spot (ECS instance):
~$0.0031 * 24 * 30 = $2.232 per month

1x Application Load Balancer:
$0.02646 * 24 * 30 = $19.0512 per month + LCU-hour charges
Total: $21.2832 per month (+ LCU-hour charges)
Resources used: